
Building Your Personal Data Powerhouse: Self-Hosting Apache Spark on Kubernetes - Part 1

Let me tell you about the time I wanted to analyze the NYC trip dataset but found my laptop gasping for air like it just ran a marathon 😅. We've all been there - you download what seems like a reasonable dataset, only to find your machine grinding to a halt when you try to open it in pandas.
The NYC trip data is a perfect example of this challenge. It's a fascinating dataset with billions of taxi and ride-sharing trips across New York City, but at several terabytes, it's enough to make any personal computer wave the white flag of surrender. The TLC website doesn't pull any punches about its size - this is serious big data territory.
But here's the thing - I didn't want to shell out hundreds of dollars for cloud computing when I already had three perfectly good computers sitting at home, doing nothing most of the time. That's when it hit me: what if I could combine their powers, Power Ranger style?
Assembling Your Data Processing Avengers
The concept is simple but powerful: pool the computational resources of all your PCs to create your own private data processing cluster. It's like when the Power Rangers combine their robots to form the Megazord to tackle bigger enemies!

At home, I've got three computers that individually would struggle with heavy data processing. But together? They form a respectable mini-cluster with 16 CPUs and 56GB RAM - enough firepower to handle substantial data analytics tasks. Here's my humble home fleet:
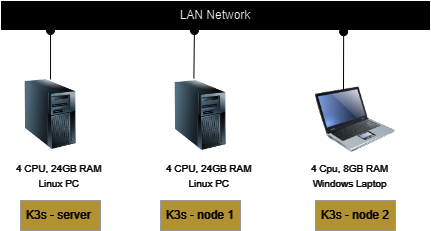
I deliberately included a Windows host in this setup because, let's be honest, most of us have at least one Windows PC at home. And surprisingly, I couldn't find any comprehensive guide for creating a multi-OS, multi-host Kubernetes setup - so I decided to build one myself!
What We're Building & Why Spark Matters
This is the first in a series where I'll show you how to:
- Create a lightweight Kubernetes cluster using K3s (this article)
- Deploy Apache Spark to process data at scale
- Connect it all to big datasets like the NYC Trip data stored in AWS S3
But why Spark? When you're dealing with datasets that make your computer cry, Apache Spark is the superhero you need. It's designed to distribute processing across multiple machines, turning what would be hours of processing into minutes. And the best part? You can write your analytics in Python using PySpark, so there's no need to learn a completely new language.
Self-hosting gives you:
- Complete control over your infrastructure
- No surprise cloud bills at the end of the month
- A playground to learn valuable skills for your career
- The satisfaction of squeezing value from hardware you already own
Let's dive in and build something cool!
In this article
- Setup Server Node and Worker Node #1 (Linux PC)
- Setup Worker Node #2 (Windows Laptop)
- Create Kubernetes Cluster (Multi-Nodes)
- Deploy Kubernetes Dashboard
Setup Server Node and Worker Node #1 (Linux PC)
Several approaches exist for installing Linux, each suited to different requirements and preferences.
In my setup with Proxmox VE, I've configured two LXCs running Ubuntu 22.04, though detailing the creation process falls beyond the scope of this guide.
It required considerable effort to operationalize, so if you're contemplating this route, be prepared for potential complexities involving Kernel modules,
OS configurations, and the use of unprivileged containers.
On the other hand, installing Ubuntu on a virtual machine or directly onto hardware (BareMetal) presents a more straightforward alternative,
with numerous tutorials available online.
Regardless of the method chosen, ensure the establishment of two Ubuntu 22.04 hosts prior to advancing to the subsequent section of this guide.
For consistency and to prevent compatibility issues, I've standardized on the same Ubuntu 22.04 version across all hosts.
Setup Worker Node #2 (Windows Laptop)
I'm utilizing a pre-existing Windows laptop, and the forthcoming steps will guide you through the process of setting up a new virtual machine on a Windows system.
- Prerequisites
- Ensure your processor supports virtualization technology.
- Enable Hyper-V or install VirtualBox. I was getting slow performance with Virtualbox and would recommend Hyper-V if using Windows 11 Pro edition.
- Spin up an Ubuntu VM using Multipass
- Visit Multipass install page and follow the steps
- Launch a command window and issue the following commands. It is recommended to use at least 8G of memory and specify the network option as the LAN interface.
REM Firstly, find out the available network interfaces
> multipass networks
Name                    Type      Description
Default Switch          switch    Virtual Switch with internal networking
Ethernet 8              ethernet  Realtek USB 2.5GbE Family Controller

REM, Set the default bridged network to your LAN adapter (eg Ethernet 8)
> multipass set local.bridged-network="Ethernet 8"

REM Launch an instance with 4 cpus, 8G ram
> multipass launch --name vm-k3n1 --cpus 4 --disk 50G --memory 8G --bridged
Launched: vm-k3n1

REM Check the instance's status and note down its IPv4 address
> multipass info vm-k3n1
Name:           vm-k3n1
State:          Running
(omitted)
IPv4:           172.29.199.195 (eth0)
               192.168.1.56 (eth1)
Release:        Ubuntu 22.04.4 LTS
(omitted)
Create Kubernetes Cluster (Multi-Nodes)
-
Install K3s in server node
# Install K3s with traefik disabled > curl -sfL https://get.k3s.io | INSTALL_K3S_EXEC="--disable traefik" sh -s [INFO] Finding release for channel stable [INFO] Using v1.28.6+k3s2 as release ... Created symlink /etc/systemd/system/multi-user.target.wants/k3s.service → /etc/systemd/system/k3s.service. [INFO] systemd: Starting k3s -
Deploy NGINX ingress controller in server node
> kubectl apply -f https://raw.githubusercontent.com/kubernetes/ingress-nginx/controller-v1.8.2/deploy/static/provider/cloud/deploy.yaml namespace/ingress-nginx created serviceaccount/ingress-nginx created ... validatingwebhookconfiguration.admissionregistration.k8s.io/ingress-nginx-admission created -
Get server token
> cat /var/lib/rancher/k3s/server/token eg. K10c625fa31bb83efca4409b3657c2bb04a5ccd5bfb8b2487e4baf899f2e0c9bc78::server:5e091abbe36d1cbad49e1de2bb774ee0 -
Install K3s in Node #1 and add node to cluster
Install and add using the one liner command below, replacing server url with your server url and mypassword from the token in the earlier step
> curl -sfL https://get.k3s.io | K3S_URL=https://192.168.1.233:6443 K3S_TOKEN=mypassword sh -s - -
Install K3s in Node #2 and add node to cluster
The installation command mirrors that of Node 1, with the distinction that we are deliberately defining the IP address and network interface. This step is crucial because K3s defaults to selecting the first network interface (eth0), which might not be the desired one for our setup.
# Do update node-ip, iface, server url and token with your values > curl -sfL https://get.k3s.io | INSTALL_K3S_EXEC="agent --node-ip=192.168.1.56 --flannel-iface=eth1" K3S_TOKEN=mypassword sh -s - --server https://192.168.1.233:6443 [INFO] Finding release for channel stable (omitted) [INFO] systemd: Starting k3s-agent # Reload and restart the service if needed, in case the node ip is not updated correctly > sudo systemctl daemon-reload > sudo systemctl restart k3s-agent -
Check the installation
Back in the server, run the commmand below to ensure all the nodes have the status "Ready" and their Internal-Ip are all on the same network (in my case, I have them all on the network 192.168.1.0/24)
root@lxc-k3s$ kubectl get nodes -o wide
NAME      STATUS   ROLES                  AGE   VERSION        INTERNAL-IP     EXTERNAL-IP   OS-IMAGE    (omitted)......
vm-k3n1   Ready    <none>                 37m   v1.28.6+k3s2   192.168.1.56    <none>        Ubuntu 22.04.4 LTS
lxc-k3s   Ready    control-plane,master   11d   v1.28.6+k3s2   192.168.1.233   <none>        Ubuntu 22.04.4 LTS
lxc-k3n   Ready    <none>                 11d   v1.28.6+k3s2   192.168.1.234   <none>        Ubuntu 22.04.4 LTS
Deploy Kubernetes Dashboard
Kubernetes dashboard is a Web UI that can be installed as an Addon to monitor the various components (pods, services, deployment etc) of your Kubernetes cluster.
We'll modify the standard installation guide slightly, tailoring it for use within a home laboratory setup
- Download the YAML deploy file
> curl -sL https://raw.githubusercontent.com/kubernetes/dashboard/v2.7.0/aio/deploy/recommended.yaml > dashboard.yaml
- Modify the downloaded file with these alterations. Note: The login will be deactivated. If this configuration does not suit your environment, consider adhering to the original guide and opt for a login token.
# In the Deployment section, change the container settings to look like this
....
containers:
        - name: kubernetes-dashboard
          image: kubernetesui/dashboard:v2.7.0
          imagePullPolicy: Always
          ports:
            - containerPort: 9090
              protocol: TCP
          args:
            - '--namespace=kubernetes-dashboard'
            - '--enable-skip-login'
            - '--disable-settings-authorizer'
          volumeMounts:
            - name: kubernetes-dashboard-certs
              mountPath: /certs
              # Create on-disk volume to store exec logs
            - mountPath: /tmp
              name: tmp-volume
          livenessProbe:
            httpGet:
              scheme: HTTP
              path: /
              port: 9090
            initialDelaySeconds: 30
            timeoutSeconds: 30
          securityContext:
            allowPrivilegeEscalation: false
            readOnlyRootFilesystem: true
            runAsUser: 1001
            runAsGroup: 2001
....
-
Deploy the changes
root@lxc-k3s$ kubectl apply -f dashboard.yaml namespace/kubernetes-dashboard created serviceaccount/kubernetes-dashboard created ... deployment.apps/dashboard-metrics-scraper created -
Do a quick test
# Get the pod name for dashboard
root@lxc-k3s$ kubectl get pods -n kubernetes-dashboard
NAME                                         READY   STATUS    RESTARTS       AGE
dashboard-metrics-scraper-5657497c4c-np75l   1/1     Running   3 (50m ago)    3d15h
kubernetes-dashboard-657b44677f-zw7zt        1/1     Running   12 (50m ago)   3d15h

# Port forward the container port 9090 to the node port 9090
root@lxc-k3s$ kubectl port-forward kubernetes-dashboard-657b44677f-zw7zt -n kubernetes-dashboard 9090:9090
Forwarding from 127.0.0.1:9090 -> 9090
Forwarding from [::1]:9090 -> 9090
After executing the commands above, the server node will be listening at port 9090. Visit http://192.168.1.233:9090 to view the dashboard UI.
-
Optional - Setup Ingress for dashboard
To access the dashboard, it's necessary to confirm that port forwarding is active Or for ease of use, an ingress can be set up with the specified yaml configuration.
---
apiVersion: v1
kind: Service
metadata:
  name: kubernetes-dashboard-http
  namespace: kubernetes-dashboard
spec:
  selector:
    k8s-app: kubernetes-dashboard
  ports:
    - protocol: TCP
      port: 80
      targetPort: 9090
---
apiVersion: networking.k8s.io/v1
kind: Ingress
metadata:
  name: dashboard-ingress
  namespace: kubernetes-dashboard
spec:
  ingressClassName: nginx
  rules:
  - host: k3dashboard.com
    http:
      paths:
      - path: /
        pathType: Prefix
        backend:
          service:
            name: kubernetes-dashboard-http
            port:
              number: 80
Let's walkthrough the above code:
- We deploy a service that will allow us to find the kubernetes dashboard pod (via the selector) listening at port 9090.
- We then deploy an ingress using the NGINX controller we previously installed, which will forward the traffic to the service when the url http://k3dashboard.com is accessed.
For #2 to work, we need to ensure the address will be mapped to the server ip address via DNS. In my case, I updated the Windows host file to include this entry:
# localhost name resolution is handled within DNS itself.
#	127.0.0.1       localhost
#	::1             localhost
192.168.1.233 k3dashboard.com
The dashboard can now be accessed with the url http://k3dashboard.com, without having to run the port forwarding.
What's Next: Unleashing Apache Spark on Your Cluster
Congratulations! You've just built a mini data center right in your own home. Your Kubernetes cluster is up and running, but this is just the foundation. In the next article of this series, I'll show you how to deploy Apache Spark on this cluster and start processing data at a scale that would make your laptop beg for mercy.
Apache Spark will allow you to:
- Process datasets much larger than your RAM capacity
- Run complex data transformations in parallel across all your nodes
- Use familiar Python syntax with PySpark
- Scale your processing as your computational needs grow
The beauty of running Spark on your own hardware is that you're not watching a cloud billing meter tick up with every computation. You can experiment, learn, and process large datasets without worrying about costs.
Why This Matters: Beyond Just a Cool Project
Building your own data processing cluster isn't just a fun weekend project (though it absolutely is that!). It's also:
- A learning laboratory: You'll gain hands-on experience with technologies that power modern data infrastructure
- A stepping stone to bigger things: The skills you learn here translate directly to cloud environments
- A practical solution: For those datasets that are too big for your laptop but not quite "rent a data center" big
- A resource optimizer: Making use of computing power you already own but might be sitting idle
Have you built your own data processing setup at home? Are you planning to follow along with this guide? I'd love to hear about your experiences or answer any questions in the comments below. After all, the best part of self-hosting is the community that comes with it!